Visible Light RTCS for Ball Movement using a WiiRemote
Video demo:
Quick Links:
BallControl Arduino Code
BallControl Processing GUI Code
To make this, all you need is the following:
- Arduino UNO (preferably R3)
- You can buy one here: http://www.robotshop.com/ca/arduino-uno-usb-microcontroller-rev-3-3.html
- Motor Control Shield
- You can buy one here: http://www.robotshop.com/ca/adafruit-motor-shield-kit-arduino-8.html
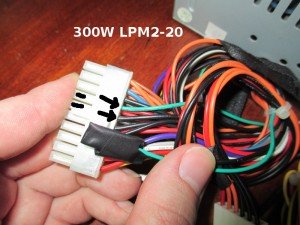
- For the power source, I used an old PC power supply. Here’s a pic showing which wires I had to twist to get the supply working:

- 2 Stepper motors
- WiiRemote
- Make sure to use a RVL-003 (the old one, not the new fancy MotionPlus stuff)
- You can check out my old post here if you haven’t connected your WiiRemote to a PC yet: POST
- Don’t forget to remove the visible light filter (you may need to buy a triangle screwdriver)
- Large bright overhead lighting source
- I used a fluorescent work-bench light with the magnifying glass removed
- Laptop + Processing software
- Here is where you can get Processing if you don’t already have it: http://www.processing.org/
- Balsa wood + black rigid-paper + black hockey-tape + packing-tape + very light and reflective plastic ball + Wires/Connectors + staples
- Silicon Putty
- One of my absolute FAVOURITE building materials
- Here is their site: http://eti-usa.com/easymold-silicone-putty/
Board Assembly:
- Arrange the wood into a square frame (held together by hockey tape).
- Line the bottom with the hard black paper and use the packing tape to both affix the paper and put the entire thing under tension.
- My finished board felt like a piece of a kit, it was kinda cool. Balsa wood is amazingly light!
- Use the hockey-tape to line the balsa wood (you want your rig to be all black for maximum contrast). Don’t use glossy paint! Here’s a pic

- Use your SiliconPutty to make legs for the steppers’ gears (one for each one)
- As for the third support leg, you can use whatever you want as long as it’s supportive and static.
Here’s a pic of my finished board’s underside:
Finalize the setup:
Now that you have the rig, with steppers ready to be attached (well screwed into the silicon putty), you can:
- Mount the WiiRemote as to have an overhead view of the well lit rig. This is where I just used an old work-bench light + rubber bands (see the video for a good shot). Make sure that all the corners are see-able by the WiiRemote (I didn’t bother making a camera/perspective matrix, so you want to be as true/square as possible). Here’s a pic

- Connect the PC power supply (or whatever you’re using) to the motor shield along with the stepper motors’ wires (I had 4-wire dual steppers). You will have to make sure you have the relative directions correct, so the control system’s idea of front / right are correct. Pic:

- Upload the Sketch BallControl Arduino Code, to the UNO, and then use the processing sketch BallControl Processing GUI Code to run.
.. Have fun, I hope to see some really cool extensions to this simple idea…


